Building a GUI
So, I built the car, now what? Well, I know python, so why not jump in and build a GUI. The Freenove code is open source (Creative Commons Attribution ShareAlike 3.0), so what better way to understand the platform than to study their code, and then write my own GUI. I'm a complete newbie to GUI code, so it took me a while to settle on how. Perhaps javascript? Perhaps something else? Anyway, I eventually decided on pygame, and I'm happy with my choice. And usefully it comes pre-installed on the pi.
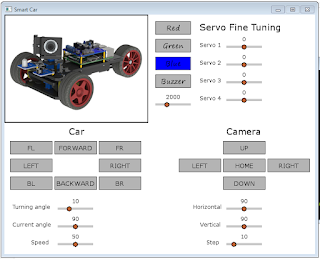
So, how do you build a GUI from scratch in pygame? With lots of googling! Turns out you need to be able to do 4 things: display text, display images/video, display buttons and display sliders. The last two are very much thanks to this code. There are no decent frameworks that help with placing objects on the pygame surface, that my googling could find, so after a lot of manual tweaking of co-ordinates here is my first gui:
It has all the basic features working. You can switch the LED's on or off. Set the buzzer frequency and then buzz it. Fine tune the servo's if they were not physically calibrated perfectly. Move the camera around, and of course control the car. My code is GPLv3 so feel free to share and modify. Github, main_v1.py.
So, we are back to now what? Well, we have the coloured LED's on our car, can we use PWM (pulse width modulation) to dim them? Seems easy right? Just switch them on and off fast enough, and they look dimmed instead of full brightness. What I didn't appreciate was how fast they have to switch! Really slow and you have a blinker. A bit faster and you have an epilepsy inducing flicker. Only when really fast do you get a true dimming effect.
On my first attempt, I started with 100 graduations in brightness, and put that in the main pygame event loop. This ended up in the very slow blinker category. Hrmm... there was always plan B. The car shield is not designed for PWM of the LED's but if we move the wiring of the LED's to the raspberry pi GPIO then we can indeed successfully PWM the LED's. But I was stubborn and wanted to do it in software without having to do any rewiring. Besides, I had some ideas yet.
Let's be a little more methodical. Let's write a script that runs by itself, remove all the GUI overhead, and controls only one colour. How fast can we make it? Here is my code:
So, we needed a dimmer function:
Anyway, the dimmer idea was a partial success. But now I was bored of it, so on to the next idea. Is there a better way to control the camera than just clicking up/down/left/right? See my next post.
So, how do you build a GUI from scratch in pygame? With lots of googling! Turns out you need to be able to do 4 things: display text, display images/video, display buttons and display sliders. The last two are very much thanks to this code. There are no decent frameworks that help with placing objects on the pygame surface, that my googling could find, so after a lot of manual tweaking of co-ordinates here is my first gui:
It has all the basic features working. You can switch the LED's on or off. Set the buzzer frequency and then buzz it. Fine tune the servo's if they were not physically calibrated perfectly. Move the camera around, and of course control the car. My code is GPLv3 so feel free to share and modify. Github, main_v1.py.
So, we are back to now what? Well, we have the coloured LED's on our car, can we use PWM (pulse width modulation) to dim them? Seems easy right? Just switch them on and off fast enough, and they look dimmed instead of full brightness. What I didn't appreciate was how fast they have to switch! Really slow and you have a blinker. A bit faster and you have an epilepsy inducing flicker. Only when really fast do you get a true dimming effect.
On my first attempt, I started with 100 graduations in brightness, and put that in the main pygame event loop. This ended up in the very slow blinker category. Hrmm... there was always plan B. The car shield is not designed for PWM of the LED's but if we move the wiring of the LED's to the raspberry pi GPIO then we can indeed successfully PWM the LED's. But I was stubborn and wanted to do it in software without having to do any rewiring. Besides, I had some ideas yet.
Let's be a little more methodical. Let's write a script that runs by itself, remove all the GUI overhead, and controls only one colour. How fast can we make it? Here is my code:
import sys
import time
import smbus

if len(sys.argv) < 2:
    pwm_blue = 5
else:
    pwm_blue = int(sys.argv[1])

CMD_IO1 = 9
CMD_IO2 = 10
CMD_IO3 = 11


def dimmer(pwm, cmd):
    smbus_address = 0x18  # default address
    bus = smbus.SMBus(1)
    bus.open(1)

    start_time = time.time()
    bus.write_i2c_block_data(smbus_address, CMD_IO1, [0, 0])
    bus.write_i2c_block_data(smbus_address, CMD_IO1, [0, 1])

    bus.write_i2c_block_data(smbus_address, CMD_IO2, [0, 0])
    bus.write_i2c_block_data(smbus_address, CMD_IO2, [0, 1])

    bus.write_i2c_block_data(smbus_address, CMD_IO3, [0, 0])
    bus.write_i2c_block_data(smbus_address, CMD_IO3, [0, 1])
    end_time = time.time()
    delta_time = end_time - start_time
    print(delta_time)

    while True:
        if pwm > 0:
            bus.write_i2c_block_data(smbus_address, cmd, [0, 0])
        for pwm_counter in range(10):
            if pwm_counter < pwm:
                time.sleep(delta_time/6)
            else:
                bus.write_i2c_block_data(smbus_address, cmd, [0, 1])


dimmer(pwm_blue, CMD_IO3)
If we can't make this fast enough, then nothing can. Basically we switch the red, green, and then blue on and off, find the delta-time, and then use that in our main pwm loop. And with a delta-time of:
$ python3 dimmer.py
0.002443075180053711
we are pretty close to dim. So in theory we might just be able to do it! But we are not quite there yet. How do we run the GUI at the same time? First I thought threading was the way to go, but that still only runs on one core. That probably wasn't going to be fast enough. Now, the raspberry pi has 4 cores, so I eventually settled on multi-processing. Again, something I was a total newbie to.
So, we needed a dimmer function:
def dimmer(n, cmd):
    smbus_address = 0x18  # default address
    bus = smbus.SMBus(1)
    bus.open(1)

    start_time = time.time()
    bus.write_i2c_block_data(smbus_address, CMD_IO1, [0, 0])
    bus.write_i2c_block_data(smbus_address, CMD_IO1, [0, 1])

    bus.write_i2c_block_data(smbus_address, CMD_IO2, [0, 0])
    bus.write_i2c_block_data(smbus_address, CMD_IO2, [0, 1])

    bus.write_i2c_block_data(smbus_address, CMD_IO3, [0, 0])
    bus.write_i2c_block_data(smbus_address, CMD_IO3, [0, 1])
    end_time = time.time()
    delta_time = end_time - start_time
    print(delta_time)

    while True:
        pwm = n.value
        if pwm == -1:
            return
        if pwm > 0:
            bus.write_i2c_block_data(smbus_address, cmd, [0, 0])
        for pwm_counter in range(5):
            if pwm_counter < pwm:
                time.sleep(delta_time/6)
            else:
                bus.write_i2c_block_data(smbus_address, cmd, [0, 1])
Some code to start our LED dimmer processes:
import multiprocessing as mp

...
        # initialize the LED dimmer's:
        dim_red = mp.Value('i', 5)
        p_red = mp.Process(target=dimmer, args=(dim_red, CMD_IO1))
        p_red.start()

        dim_green = mp.Value('i', 5)
        p_green = mp.Process(target=dimmer, args=(dim_green, CMD_IO2))
        p_green.start()

        dim_blue = mp.Value('i', 5)
        p_blue = mp.Process(target=dimmer, args=(dim_blue, CMD_IO3))
        p_blue.start()
And code to change the pwm frequency when our pwm sliders change:
def red_pwm_moved(val):
    if have_smbus:
        if is_red:
            dim_red.value = int(val)
        else:
            dim_red.value = 0


def green_pwm_moved(val):
    if have_smbus:
        if is_green:
            dim_green.value = int(val)
        else:
            dim_green.value = 0


def blue_pwm_moved(val):
    if have_smbus:
        if is_blue:
            dim_blue.value = int(val)
        else:
            dim_blue.value = 0
where dim_red.value, dim_green.value and dim_blue.value allow us to communicate with our dimmer processes. Then when we exit our code, we need to switch off our dimmers:
# switch off dimmer processes:
dim_red.value = -1
p_red.join()

dim_green.value = -1
p_green.join()

dim_blue.value = -1
p_blue.join()
Full code here, and here is the gui (note the addition of the red, green and blue sliders):
Anyway, the dimmer idea was a partial success. But now I was bored of it, so on to the next idea. Is there a better way to control the camera than just clicking up/down/left/right? See my next post.


Comments
Post a Comment