Posts

panorama-scan

Image
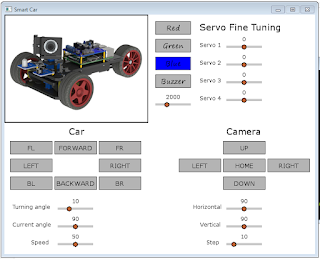
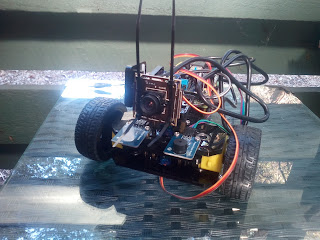
In this post I introduce the panorama-scan code. Once you put a decent quality camera on the car, the camera servo is perfect for creating panoramic scans. There was a slight problem with this idea. You need to be logged in to the car to start and stop code. How can we set the car to scan when a long way from your home wifi network? I opted for a script that starts up at boot-up, and auto-runs the panorama-scan if it is not associated with a network, and does nothing if it is. The idea being if it is in wifi range of my network, I don't need the panorama-scan to start by itself. So with this setup, I take my car to some scenic spot, power it up, wait for it to scan. Power down, move to the next spot. And so on. Here is our start-up script : #!/bin/bash # wait a while, hopefully long enough for network to start: sleep 2m # check if we can reach google DNS: nc -zw 1 8.8.8.8 53 >/dev/null 2>&1 online=$? # NB: raspberry pi time is only updated when connected to a netw

using edge-enhance

Image
Last post we installed opencv on our car. This post we put it to use with edge-enhance. First, we need some decent test images. Well, thanks to my panorama-scan, which I will discuss in my next post, I have some. Let's jump right into the images, and then give the code later. So, we have this image: Now we edge enhance it: Then we edge enhance it in grayscale mode: Then we have this image: Now we edge enhance it: Then in grayscale mode: It works OK I suppose. I wonder if we can improve it? Anyway, here is my code , inspired by this code : import sys import numpy as np import cv2 iterations = 10 def massage_pixel(x): if x < 0: x = 0 # x *= 20 x *= 30 # x *= 3.5 x = int(x) if x > 255: x = 255 return 255 - x def main(argv): filename = "ave-img.png" img_codec = cv2.IMREAD_COLOR grayscale = False if argv: filename = sys.argv[1] if len(argv) >= 2 and sys.argv[2] == &quo

installing opencv

OK. We set up our raspberry pi. We built a car around it. We made a serviceable GUI for it. We toyed with PWM. Now what? Well, we spent some money on a good usb camera, so how about image processing? Again, something relatively new for me. There is a fantastic collection of code called opencv , so let's use that. "OpenCV (Open Source Computer Vision) is a library of programming functions mainly aimed at real-time computer vision." To install it on the Raspberry Pi is a little bit of work, but with some googling, and following directions, it worked. But given the pi's speed and limited RAM, anything intensive is probably best done on another box. Here are the install instructions that worked for me: sudo apt-get install build-essential sudo apt-get install cmake git libgtk2.0-dev pkg-config libavcodec-dev libavformat-dev libswscale-dev sudo apt-get install python-dev python-numpy libtbb2 libtbb-dev libjpeg-dev libpng-dev libtiff-dev libjasper-dev libdc1394-22-dev m

introducing active-map

Image
Let's keep tweaking our GUI. I decided to implement what I call an active map. Code below. Instead of changing the camera angle by clicking up 10 degrees, left 10 degrees, up another 10 degrees, how about we have a map. The map covers the full 0-180 * 0-180 angle range (of the two camera servos), and you click on the location you want the camera to move to. After an afternoon of coding, I now had: I'll dive straight into the code. First we need these two helper functions: def constrain(val, min_val, max_val): val = max(val, min_val) val = min(val, max_val) return val def num_map(value, fromLow, fromHigh, toLow, toHigh): return (toHigh-toLow)*(value-fromLow) / (fromHigh-fromLow) + toLow constrain ensures val is in the range min_val <= val <= max_val, while num_map maps val from the range [fromLow, fromHigh] to the range [toLow, toHigh]. And here is our new active-map class: class ActiveMap(): def __init__(self, name, width, val, maxi, mini, xpos

Building a GUI

Image
So, I built the car, now what? Well, I know python, so why not jump in and build a GUI. The Freenove code is open source (Creative Commons Attribution ShareAlike 3.0), so what better way to understand the platform than to study their code, and then write my own GUI. I'm a complete newbie to GUI code, so it took me a while to settle on how. Perhaps javascript? Perhaps something else? Anyway, I eventually decided on pygame , and I'm happy with my choice. And usefully it comes pre-installed on the pi. So, how do you build a GUI from scratch in pygame? With lots of googling! Turns out you need to be able to do 4 things: display text, display images/video, display buttons and display sliders. The last two are very much thanks to this code . There are no decent frameworks that help with placing objects on the pygame surface, that my googling could find, so after a lot of manual tweaking of co-ordinates here is my first gui: It has all the basic features working. You can switch

Introduction to the smart car project

Image
Welcome to my new blog! I recently bought a Raspberry Pi based smart car from Freenove as a fun little intro to robotics and computer vision. This blog is to document my progress and my code. I've only just started, but hopefully I can get somewhere interesting. And I'm looking forward to playing with opencv using the images generated by my car. Besides the car from Freenove, I needed a couple of other things, so here was my shopping list: Freenove 3-wheeled smart car kit, for raspberry pi Raspberry Pi model 3 B+ Raspberry Pi power supply micro SD card (SDXC preferable) micro SD card reader 2 * 18650 lithium batteries 18650 lithium battery charger good quality USB camera magnetic tip phillips head screwdriver (for all those fiddly little screws) Note that the car does come with a usb camera, but I wanted something higher end, something better suited for computer vision experiments. Next, I spent an afternoon setting up the raspberry pi so I could VNC in to a static wifi