using edge-enhance
Last post we installed opencv on our car. This post we put it to use with edge-enhance. First, we need some decent test images. Well, thanks to my panorama-scan, which I will discuss in my next post, I have some. Let's jump right into the images, and then give the code later.
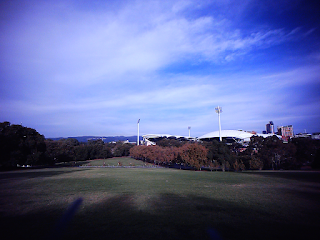
So, we have this image:
 Now we edge enhance it:
 Then we edge enhance it in grayscale mode:

Then we have this image:
 Now we edge enhance it:
 Then in grayscale mode:
 It works OK I suppose. I wonder if we can improve it? Anyway, here is my code, inspired by this code:
We do need to note that this is a little slow on the raspberry pi, and takes a couple of minutes to complete. The massage pixel loop is a big factor in this, so perhaps cython might help? I'll try that at some point.
So, we have this image:


Then we have this image:


import sys
import numpy as np
import cv2

iterations = 10


def massage_pixel(x):
    if x < 0:
        x = 0
#    x *= 20
    x *= 30
#    x *= 3.5
    x = int(x)
    if x > 255:
        x = 255
    return 255 - x


def main(argv):
    filename = "ave-img.png"
    img_codec = cv2.IMREAD_COLOR
    grayscale = False
    if argv:
        filename = sys.argv[1]
        if len(argv) >= 2 and sys.argv[2] == "--grayscale":
            img_codec = cv2.IMREAD_GRAYSCALE
            grayscale = True

    src = cv2.imread(filename, img_codec)
    if src is None:
        print("Can't open image [" + filename + "]")
        print("Usage:")
        print("edge-enhance.py image_path [--grayscale]")
        return -1

    cv2.namedWindow("Input", cv2.WINDOW_AUTOSIZE)
    cv2.namedWindow("Output", cv2.WINDOW_AUTOSIZE)
    cv2.imshow("Input", src)

    kernel = np.array([[1/16, 1/16, 1/16],
                       [1/16, 1/2, 1/16],
                       [1/16, 1/16, 1/16]], np.float32)

    dst1 = cv2.filter2D(src, -1, kernel)
    # ddepth = -1, means destination image has depth same as input image

    # now do it iterations times:
    for _ in range(iterations - 1):
        dst1 = cv2.filter2D(dst1, -1, kernel)

    # now subtract original image:
    dst = cv2.subtract(dst1, src)

    # now massage the pixels:
    if grayscale:
        height, width = dst.shape
        for i in range(0, height):
            for j in range(0, width):
                dst[i, j] = massage_pixel(dst[i, j])
    else:
        height, width, depth = dst.shape
        for i in range(0, height):
            for j in range(0, width):
                for k in range(0, depth):
                    dst[i, j, k] = massage_pixel(dst[i, j, k])

    # now smooth once more:
    # dst = cv2.filter2D(dst, -1, kernel)

    cv2.imshow("Output", dst)

    # save the result:
    filename, ext = filename.rsplit('.', 1)
    if grayscale:
        filename = filename + "--edge-enhanced-" + str(iterations) + "--gray." + ext
    else:
        filename = filename + "--edge-enhanced-" + str(iterations) + "." + ext
    print('dest:', filename)

    # save output:
    cv2.imwrite(filename, dst)

    # tidy up and close:
    cv2.waitKey(0)
    cv2.destroyAllWindows()
    return 0


if __name__ == "__main__":
    main(sys.argv[1:])
Now, there are a couple of obvious places to fine-tune this code. The first is to change the value of 'iterations' to something other than 10. The other thing we could change is the massage-pixel function, either to something completely new, or simply tweak the 'x *= 30' line. We do need to note that this is a little slow on the raspberry pi, and takes a couple of minutes to complete. The massage pixel loop is a big factor in this, so perhaps cython might help? I'll try that at some point.
    height, width, depth = dst.shape
    for i in range(0, height):
        for j in range(0, width):
            for k in range(0, depth):
                dst[i, j, k] = massage_pixel(dst[i, j, k])
The other thing to note is that annoyingly, writing to the destination directory was silently failing. Invoking with sudo fixes this:$ sudo python3 edge-enhance.py panorama/panorama-images/7/90.png $ sudo python3 edge-enhance.py panorama/panorama-images/7/90.png --grayscaleIn the next post I introduce panaroma-scan. A fun little bit of code that allows you to take panorama scans using your car.

Comments
Post a Comment